Thinking about getting tape-in extensions for the first time? You’re not alone. As one of the most popular semi-permanent hair extension methods, tape-ins are a favorite among clients and stylists alike for their versatility, comfort, and natural appearance. But if you’ve never had them before, it’s normal to have questions. What happens during the appointment? How should you prepare? What will your hair look and feel like afterward?
In this blog, we’ll explain everything you need to know about your first tape-in extensions appointment—from pre-visit preparations to the installation process and aftercare tips—so you can walk in confidently and walk out with fabulous hair.
What Are Tape-In Extensions?
Before the appointment process, it helps to understand tape-in extensions. These thin, lightweight hair wefts are pre-taped and then “sandwiched” between sections of your natural hair. They lie flat against your scalp, blend seamlessly, and can be styled just like your own hair.
Typically made from 100% Remy human hair, these extensions offer a natural look and feel. They’re semi-permanent, lasting anywhere from 6 to 8 weeks before needing to be reinstalled or adjusted. Best of all, they’re less damaging than other extension types when applied and maintained properly.
Step 1: Consultation – The Most Important Part
Most professional salons require a consultation before installing tape-in extensions, especially for first-timers. This is your opportunity to ask questions, choose your desired length and color, and have your stylist evaluate the condition of your natural hair.
What to Expect:
- Hair Assessment: Your stylist will assess your hair’s density, texture, and length to determine how many tape-in packs you’ll need.
- Color Matching: If you want your extensions to blend perfectly, the stylist will match the extensions to your hair color. Some salons even offer custom coloring services.
- Length & Style Goals: Discuss your hair goals—whether you’re aiming for volume, length, or both.
- Budget Planning: Tape-in extensions vary in cost depending on hair quality, number of wefts, and salon pricing. Expect a full installation to range from $300 to $800+.
Pro tip: Bring photos for inspiration!
Step 2: Prepping for Your Appointment
To get the best results, it’s important to prepare your hair correctly before the appointment.
Do:
- Wash your hairthoroughly with a clarifying shampoo 24–48 hours before the appointment to remove oil and product buildup. Clean hair ensures the adhesive tapes bond securely.
- Avoid conditionernear the roots, as it can cause the tape to slip.
- Blow dry and straighten your hairif your stylist recommends it (check during the consultation).
Don’t:
- Use any leave-in products or oils.
- Arrive with wet or damp hair unless your stylist instructs otherwise.
Step 3: Installation – What Happens in the Chair
The installation process typically takes 1.5 to 3 hours, depending on how many tape-ins you’re getting and your hair’s condition.
The Process:
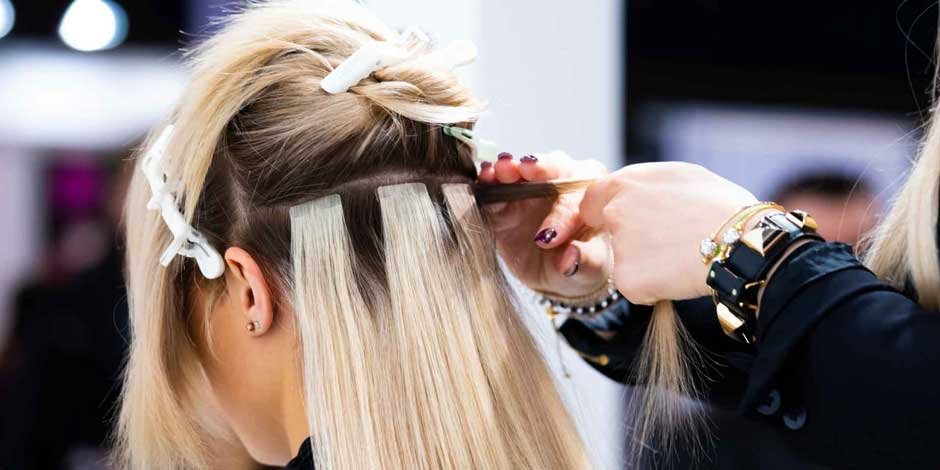
- Sectioning the Hair: Your stylist will start by parting your hair into clean, precise sections.
- Application of Tape-In Extensions: Each tape-in weft is applied by placing your natural hair between two adhesive strips. Think of it as a “hair sandwich.”
- Blending: Once all wefts are applied, your stylist will trim and layer the extensions to blend seamlessly with your natural hair.
- Styling: After blending, your hair will be styled so you can see the final result, and it’s often jaw-dropping.
How It Feels:
You might feel a slight tug as the stylist presses the wefts together, but it shouldn’t be painful. Once applied, tape-in extensions should feel secure but lightweight. Some clients report a “tight” feeling during the first day or two, but this usually disappears quickly.
Step 4: Aftercare Instructions
Proper aftercare ensures that your tape-in extensions last and remain damage-free.
The First 48 Hours:
- Avoid washing your hairto allow the adhesive time to fully bond.
- Don’t apply heatdirectly to the tape tabs.
- Keep hair dryand avoid sweating excessively.
Daily Maintenance:
- Brush gentlywith an extension-safe brush, starting from the ends and working your way up.
- Avoid oil-based productsnear the roots or tape area.
- Braid your hairloosely at night to prevent tangling.
Washing & Styling:
- Use sulfate-free shampoos and conditioners.
- Wash hair 2-3 times per weekto avoid weakening the tape adhesive.
- You can style with heat tools, but always apply a heat protectant and avoid direct heat on the tape bonds.
How Long Do Tape-In Extensions Last?
With proper care, tape-in extensions can last 6–8 weeks before needing to be moved up or reinstalled. Since they’re reusable, the same hair can last up to 6 months or longer if maintained well. Your stylist will remove and reapply them using medical-grade adhesive.
What Results Can You Expect?
Tape-in extensions deliver immediate and stunning results. Whether you’re looking to add volume, length, or both, the transformation is often dramatic—in the best way possible.
Benefits:
- Natural Look & Feel: Tape-ins lie flat and blend beautifully.
- Lightweight & Comfortable: Less bulky than other methods.
- Quick Application: Faster than strand-by-strand extensions.
- Reusable Hair: Cost-effective over time.
Common First-Time Concerns
It’s completely normal to have a few concerns going into your first tape-in appointment. Here’s how they’re usually addressed:
- Will it damage my hair?When installed and removed properly by a trained stylist, tape-ins are among the least damaging semi-permanent extension methods.
- Will people notice them?Not unless you tell them. The tapes are hidden between sections of your natural hair.
- Can I wear my hair up?Yes, but you’ll need to be strategic about placement and styling to conceal the tape tabs.
- What if I want to remove them?Your stylist can safely remove tape-in extensions using a special solution that dissolves the adhesive without harming your natural hair.
Final Thoughts
Your first tape-in extensions appointment can feel like a big step, but with the right preparation and expectations, it’s an exciting transformation that many clients say is life-changing. Not only do you walk out with longer, fuller hair, but you also gain the confidence that comes with loving your new look.
To make the most of your tape-in experience:
- Choose an experienced stylist.
- Follow aftercare instructions closely.
- Schedule maintenance appointments every 6–8 weeks.
Tape-in extensions are more than just a beauty treatment—they’re a lifestyle upgrade. Whether you’re preparing for a special event, growing out a bad haircut, or simply ready for a change, tape-ins might be the perfect solution for achieving your dream hair.