Installing a new HVAC system is a significant upgrade for any home or business. Whether replacing an outdated unit or setting up a system for new construction, the installation process requires careful planning and professional handling. A properly installed HVAC system ensures efficient heating and cooling, improves indoor air quality, and helps manage energy costs. In some cases, a modular cleanroom may be necessary to maintain strict environmental conditions, especially in industries like pharmaceuticals or electronics manufacturing. Home and business owners often have questions about what to expect during the process, from initial assessments to final testing. Knowing what steps are involved makes the installation smoother and helps prevent surprises. We will explore what happens during a new HVAC system installation, including the preparation, installation process, and post-installation checks. A well-installed HVAC system provides long-term comfort, reliability, and efficiency, making it a worthwhile investment for any property.
Steps involved in a new HVAC system installation
Assessing the Property and Selecting the Right System
The first step in an HVAC installation is assessing the property to determine the right system size and type. An improperly sized unit can lead to inefficiencies, increased energy costs, and frequent repairs. A system that is too small may struggle to maintain a comfortable temperature, while one that is too large could cycle on and off too frequently, leading to unnecessary wear and tear. To recommend an appropriate system, the contractor evaluates the square footage, insulation levels, window placements, and ductwork layout.
Energy efficiency is another factor considered during the assessment. Many HVAC systems come with efficiency ratings, such as SEER (Seasonal Energy Efficiency Ratio) for air conditioners and AFUE (Annual Fuel Utilization Efficiency) for furnaces. Higher-rated systems may cost more upfront but can significantly reduce energy bills over time. The contractor will also discuss available features, such as smart thermostats, zoning capabilities, and humidity control, to tailor the system to the property’s needs. Once the correct system is selected, the next step is preparing for installation.
Removing the Old System and Preparing the Space
If an existing HVAC system is being replaced, the old unit must first be removed. This step involves shutting off the system’s power and safely disconnecting any electrical and gas connections. The refrigerant in the old unit is carefully handled according to environmental regulations to prevent harmful emissions. Ductwork and vents may also need adjustments or replacements depending on the system’s condition.
Preparing the space involves ensuring proper ventilation and support structures for the new system. If modifications are required, such as reinforcing the unit’s placement area, these adjustments are made before the new system arrives. In cases where the installation includes new ductwork, the contractor maps out the layout and begins installing or sealing ducts to ensure proper airflow. Proper preparation ensures a smooth installation process and minimizes disruptions once the new system is in place.
Installing the Indoor and Outdoor Units
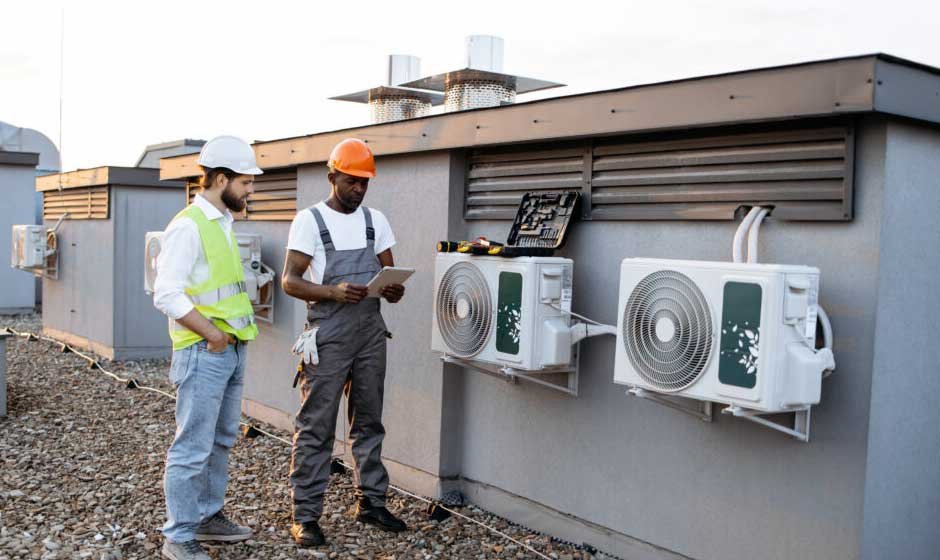
HVAC systems typically consist of indoor and outdoor components. The indoor unit, such as a furnace or air handler, is installed in a designated space like a utility room, attic, or basement. It is connected to existing or newly installed ductwork, ensuring air flows efficiently throughout the building. Electrical connections and safety shut-off switches are set up to allow proper system operation.
The outdoor unit, such as a heat pump or air conditioner condenser, is placed on a stable surface, often a concrete pad. Proper positioning is essential to allow for adequate airflow and easy maintenance access. The contractor secures the unit, connects refrigerant lines, and correctly installs drainage systems to prevent water buildup. Once both units are in place, the next step is connecting them and testing the system for proper function.
Connecting the System and Checking for Leaks
After installing the indoor and outdoor components, the next step is connecting electrical wiring, refrigerant lines, and ventilation ducts. Proper wiring ensures the system functions safely, while refrigerant lines are checked for leaks before fully charging. Any leaks in refrigerant lines can lead to reduced efficiency and system malfunctions, so this step is critical.
Airflow is also tested at this stage to confirm that ducts are sealed properly and there are no obstructions. Uneven airflow can lead to inconsistent heating or cooling, causing discomfort in specific home or business areas. If adjustments are needed, they are made before moving on to system testing. The contractor verifies the system’s operation once all connections are secure and leak-free.
Explaining Maintenance and System Operation
Once the installation is complete, the contractor provides an overview of operating and maintaining the new system. This includes setting the thermostat, changing filters, and scheduling routine maintenance. Proper upkeep is essential to maintaining efficiency and preventing long-term issues. Many HVAC systems require filter replacements every few months, while professional tune-ups should be scheduled at least once a year.
HVAC Contractors In Oklahoma City may also provide warranty information and service recommendations to ensure the system remains covered under manufacturer guidelines. Understanding how to care for an HVAC system helps extend its lifespan and ensures it operates efficiently. The installation process is officially complete once the homeowner or business owner feels comfortable with the system’s operation.
A new HVAC system installation involves several key steps, from assessing the property and selecting the right unit to final testing and maintenance guidance. Proper planning ensures the system is sized correctly, meets energy efficiency goals, and provides consistent heating and cooling. Removing the old system, preparing the space, and carefully installing indoor and outdoor units help prevent complications during setup.