While planning a wedding, one big task is making sure your watercolor wedding invitations and wedding save the date magnets look like they belong together. Matching them perfectly creates a vibe that screams “you.” Let’s dive into some easy tips to make this happen without stress.
Pick a Color Palette That Pops
First thing, choose colors wisely. Watercolor designs love soft, dreamy hues like blush pink, lavender, or sage green. Think about your wedding theme. Beachy? Go for blues and sandy tones. Forest vibes? Greens and earthy browns. Stick to three or four colors max. Too many colors make it messy. Use the same palette for both invitations and magnets. This ties them together like peanut butter and jelly.
Keep the Design Style Consistent
Next up, design style matters. Watercolor is artsy, so lean into that. If your watercolor wedding invitations have loose, flowy brushstrokes, don’t slap a rigid geometric pattern on the magnets. That’s like wearing sneakers with a ball gown. Maybe pick a floral motif or abstract washes. Whatever you choose, make sure both pieces feel like they’re from the same artist’s sketchbook.
Match the Mood with Fonts
Fonts set the tone. Romantic? Try a cursive, handwritten font. Modern? Go clean and sans-serif. Pick one or two fonts and use them on both the invitations and magnets. Mixing too many fonts looks chaotic, like a toddler picking outfits. For example, a fancy script for names and a simple font for details works great. Keep sizes readable—nobody wants to squint.
Use the Same Paper or Material Vibes
Paper choice is sneaky important. Invitations usually go on thick, textured cardstock to feel luxe. Magnets? They’re different but should still vibe. If your invitations have a soft, cottony feel, pick magnets with a smooth finish, not glossy plastic. Some printers let you add a watercolor texture to magnets too. It’s like they’re cousins, not strangers.
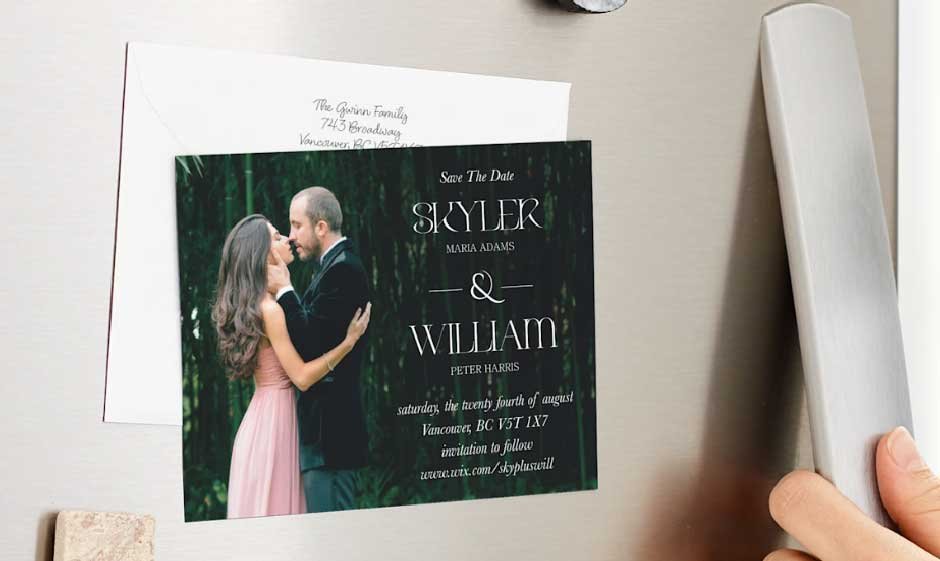
Tell a Story with Imagery
Watercolor loves imagery. Maybe your invitations have a painted rose. Put that same rose on the magnet. Or, if your wedding’s at a barn, a watercolor barn sketch could tie things together. The trick? Don’t overdo it. One or two key images keep it classy. It’s like telling a story—your love story—without shouting.
Timing and Info Sync-Up
Practical stuff now. Save the date magnets go out first, so they’re like the teaser trailer. Invitations come later with all the juicy details. Make sure the info matches. Same date, same venue, same spelling. Sounds obvious, but mix-ups happen. Use the same wording style too. If the magnet says “Join us for love and cake,” don’t make the invitation super formal. Keep it cohesive.
Work with a Designer (or DIY Smart)
Hiring a pro is awesome. Tell them you want both pieces to match like twins. Show them your vision—Pinterest boards are gold. Going DIY? Canva or Etsy templates are your friends. Pick a template set that includes both invitations and magnets. Tweak colors and fonts to fit your theme, but don’t stray too far from the original design. Consistency is key.
Test Before You Send
Before you hit print, get samples. Hold the invitation and magnet side by side. Do they feel like a pair? Show them to a friend for a gut check. Sometimes, colors look different on screen than in person. Fix any weirdness now, not after 200 magnets are printed. Also, check magnet strength—nobody wants them sliding off the fridge.
Add a Personal Touch
Finally, make it yours. Maybe add your initials in a watercolor heart. Or include a tiny quote you both love. These little details make guests smile. They’ll stick the magnet on their fridge and think, “Wow, this couple’s got style.” It’s like a sneak peek of your big day.
Wrapping It Up
Matching your invitations and magnets isn’t rocket science. Pick a color palette, stick to a design style, and keep fonts and imagery in sync. Use similar materials, double-check info, and add a personal touch. Whether you hire a designer or DIY, test everything first. Follow these steps, and your wedding stationery will look like it was made for each other—just like you and your partner.