When starting to design a jewelry box, you need to determine the type, value, and cost of your jewelry. This directly determines the structure, lining, materials, and finish of the jewelry box. Jewelry design should proceed from the inside out, not the other way around. XiangGe specializes in custom-made and manufactured paper jewelry boxes, and this guide will show you how to design a jewelry box that both protects your jewelry and aligns with your brand image.
This guide will help you learn
- How to choose size for each jewelry SKU (design your own jewelry box)
- Which box structure fits value and opening style experience
- How to design inserts that protect without extra cost
- How to match materials to brand grade and price level
- How thick your board should be for drop test and shipping
- How to pick lining fabric that adds luxury feel
- How to avoid wasted internal volume and CBM loss
- Which finishing methods lift perceived value without overspend
- Common design mistakes that cause defects or loose structure
What jewelry sizes and SKUs will the box need to fit?
Start with everyday jewelry: rings, necklaces, earrings, bracelets, or watches.
Your jewelry tray dimensions must perfectly match the actual items, with a tolerance of ±0.5 mm. If your inner tray is too tight, rings won’t fit; if it’s too loose, the jewelry may wobble or even scratch during transport. Therefore, always determine the final dimensions based on actual jewelry samples before designing. Your jewelry box design should begin here.
Most jewelry brands overlook this step, and subsequent modifications can result in a 60% rework rate.
For higher-value jewelry, increase padding and shock-absorbing gaps. For lower-priced jewelry, reduce foam usage and keep the inner tray simple.
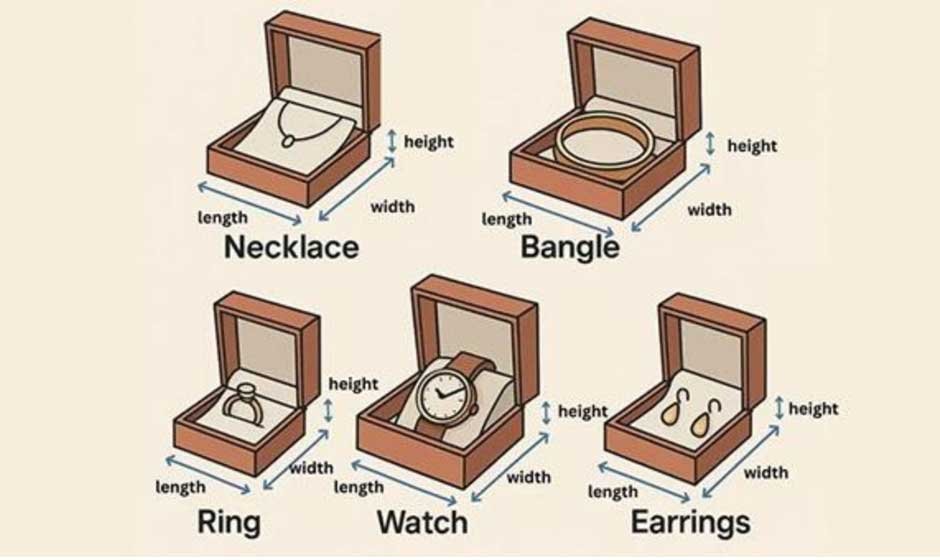
SKU planning example
| Jewelry Type | Ideal Internal Slot (mm) | Insert Type | Why it Matters |
| Ring | 18–22 diameter slot | EVA tray + velvet | Soft hold, less rubbing |
| Necklace | 80–120 length channel | Flocked board + hook | Stops tangle, flat display |
| Bracelet | 60–70 width | Foam roll core | Keeps shape during drops |
| Earrings | 10–15 hole spacing | Paperboard card insert | Good for low-cost SKUs |
Practical tips:
Measure the jewelry dimensions first; don’t rely solely on catalog sizes. Test 50-100 samples to determine tolerances.
Allow your customers to pry the jewelry with their fingers; otherwise, they won’t be able to remove it.
Real-world example: One customer added only 1mm of clearance after testing, which reduced the chance of scratching the jewelry surface and consequently lowered the return rate by 35%.
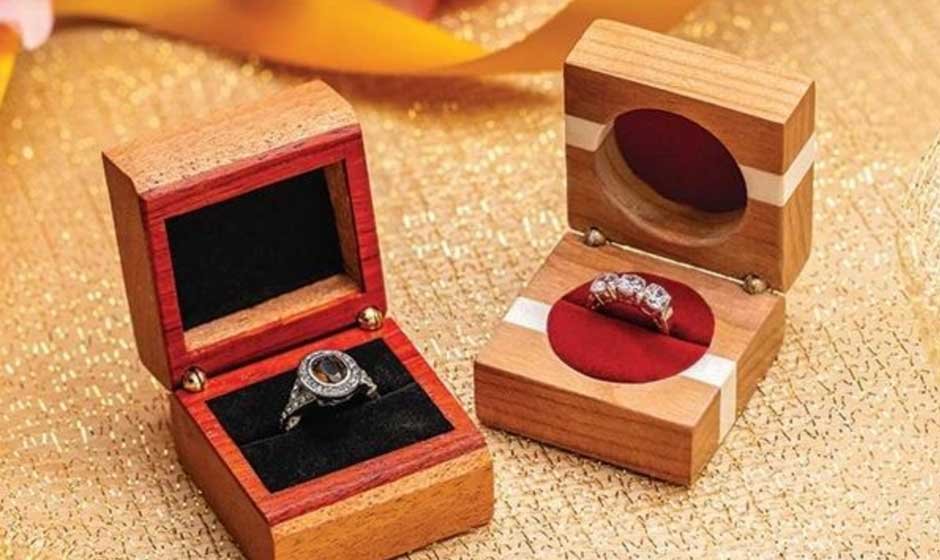
Tray, drawer, flip lid — which structure works best?
Jewelry packaging design depends on your intended opening method and the value of the product.
Magnetic flip-tops open fastest at retail counters. Drawer-style packaging adds a touch of ceremony and is suitable as a gift. Book-style packaging is suitable for sets such as necklaces and earrings. Flip-top packaging performs best during express delivery.
How insert layout protects jewelry without cost increase?
The padding provides 70% protection. When choosing materials, focus on the protection rating, not the color.
| Insert Material | Look & Feel | Best Use | Trade-off |
| Sponge | Soft, cheap | budget earrings | short life, deforms fast |
| EVA | Firm support | rings, watches | white shows dirt, black better |
| Flocked tray | Premium feel | luxury sets | higher cost but holds shape |
| Velvet pad | Very soft | high-value SKUs | dust absorption risk |
What materials fit your brand level and budget?
Consider brand value, not just texture.
Cardboard is suitable for economy retail packaging, grey cardboard for mid-range boxes, laminated cardboard offers a premium, substantial feel, and soft-touch paper conveys a sense of luxury to your customers. Learn to custom jewelry packaging boxes.
How to choose exterior style that fits branding?
You want your customers’ gestures and the unboxing experience to complement each other, providing a smooth and seamless experience for your users.
Drawer-style design, slow opening, suitable as a gift. Magnetic lid, smooth and easy to use, suitable for retail. Fabric packaging, providing a luxurious tactile experience. Solid color print, a clear brand image.
How thick should the board be for strength and shipping safety?
You do not guess mm — you match to drop test target.
| Board Thickness | Use Case | Why |
| 1.0–1.5mm | low-cost earrings | light, cheap |
| 2.0–2.5mm | standard jewelry retail | balance of strength |
| 3.0mm+ laminated | luxury heavy feel | no crush in transport |
What fabric or lining gives the right luxury touch?
- Velvet = soft, classy, but needs dust protection
- Flocked board = premium, stable, color-rich
- Satin = elegant but slippery for rings
- PU leather = strong identity, modern style
Pick based on sensory feel when customer first touches.
How to calculate internal space without wasted volume?
Design the interior first, then the exterior of the jewelry box.
The design must consider the jewelry size, gaps, and insert wall thickness.
The outer shell is only applied after the tray is secured. This avoids 40% of the waste from redesigns.
What printing and logo process enhances perceived value?
Minimal use, one hero highlight.
Gold foil works when subtle. Blind emboss gives depth. UV adds shine for logos only. Too many effects = cheap look.
What finishing feels premium while staying cost-effective?
- Pick soft-touch filminstead of heavy foil flood
- Select 1-color print + single foilinstead of complex CMYK + emboss + varnish
- Use fabric wrap + small foilfor luxury without extra colors
What mistakes lead to unstable structure or high defect rate?
Most come from tolerance, magnet alignment, and humidity reaction.
Checklist before approval:
- Slot tolerance within ±0.5mm
- Magnet aligned or lid pops open
- Coating passes 24–48h humidity test
- Ribbon survives 500 pulls
- Flocking rub test >50 cycles
2025 trends in jewelry box design
- foldable magnetic box reduces shipping volume 40–60%
- single-foil logo becomes luxury signal, not full chrome
- insert color contrast (black + rose gold) drives perceived value
FAQs
Q1: How do I start jewelry box design with factory logic?
A1: Start with jewelry type + unit value + target cost. From jewelry boxes inside first.
Q2:What is the cheapest insert that still protects jewelry?
A2: EVA black is balance of cost and safety.
Q3:Is board thickness more important than printing?
A3: Yes. Strength comes from thickness, not foil.
Q4: How to avoid magnet misalignment?
A4: Add tolerance test before final assembly.
Conclusion
The best jewelry box design begins with the jewelry’s specifications and objectives. Before making the outer shell, determine the tray and lining. Control the sheet thickness to ensure strength. Choose a finish for branding. Before mass production, test tolerances, magnets, flocking, and humidity. Good design protects jewelry, reduces volume, and enhances its value.
Next step:
If you want to design your own jewelry box, measure the actual number of SKUs, choose a suitable lining based on your risk level, and select a structure that meets your users’ unboxing experience. Then plan your costs based on the number of finishes and the thickness of the sheet metal. Now you can start sketching your DIY jewelry box design or find samples from our XiangGe package factory for design.
About XiangGe Package
We specialize in designing and exporting jewelry packaging for jewelry brands.
Our team focuses on brand CMF (Color Management), tolerance control, drop test sampling, and foldable, volume-saving structures.
We specialize in protective linings, stable magnetic alignment, and long-lasting flocking.
Get structure suggestions based on your SKU list → Contact XiangGe package.
Title: How to Design a Jewelry Box
Mate description: Jewelry box design guide: choose structure, inserts, materials, board thickness, and finishes to protect jewelry with premium feel and lower cost.